
In this post we are going to use a Metro M4 AirLift (WiFi) fn-1 with a 2.7” ePaper / eInk fn-2 display with Tri-Color rendering capability to create a price tracker of certain Crypto currencies over the last 24 hours, all using Arduino.
I clarify that I haven’t worked with circuits or with Arduino for a long time, so the code may be able to be improved, but since there are so few examples I think it could be useful to someone.
#.The idea
The idea is simple, we will use the Metro M4 Airlift, programmed with Arduino, to make a call to the Binance API and we will look for the changes of a list of crypto currencies (such as ETH, IOTA, etc.) from time to time.
With the help of Arduino, we will obtain each of those values and convert them into a result in JSON fn-3 format and display them on the eInk screen. The benefit of the eInk display is that it uses very little power, compared to an LCD display. These are the screens that we can see on a device like the Amazon Kindle.
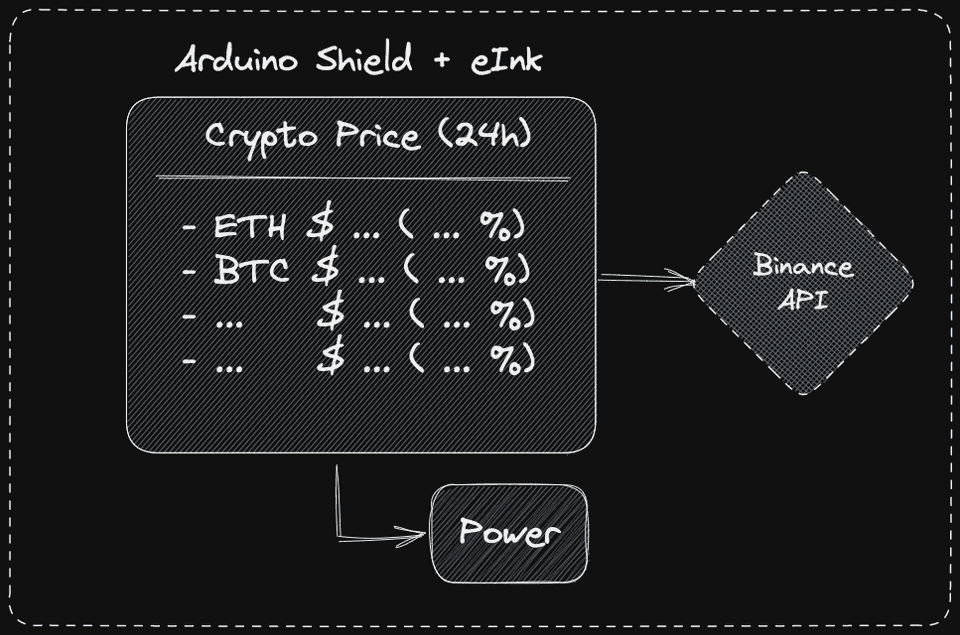
The advantage of using the Metro M4 Airlift (WiFi) is that it has connectivity through the network, through WiFi, so it is not necessary to have the device connected to our computer for it to work and we can use a small battery to power both the Metro M4 and the eInk screen.
Note: the Metro M4 can be connected to any 5V source, via a micro-USB cable. Therefore, we can connect it to a conventional rechargeable battery bank.
As the display we use is three colors (white/nothing, black, red), if the value has changed to negative during the last 24 hours, we will display it in red, otherwise in black.
Additionally, we will show a small title and a separator at the top of the screen.
#.Libraries that we are going to use
We are going to use the Binance API, which does not require any type of authentication to make queries.
Additionally, for this code we are going to use the following libraries in our Arduino code:
- Adafruit GFX, Adafruit EPD and Adafruit NeoPixel: to communicate with our screen.
- ArduinoJSON: to convert the Binance API request result into JSON format.
- WiFiNINA: to be able to connect to the WiFi network that we have
#.# Connecting to WiFi
To connect to the network, we will use the WiFiNINA library, which is very well documented fn-4. We must supply both the network name (SSID) and the password and use the rest of the library.
// ...

#define WIFI_SSID "TU SSID"
#define WIFI_PASSWORD "TU PASSWORD"

// ...
bool connectWifi() {
  Serial.println("Connecting to WiFi...");

  WiFi.setPins(SPIWIFI_SS, SPIWIFI_ACK, ESP32_RESETN, ESP32_GPIO0, &SPIWIFI);

  if (WiFi.status() == WL_NO_MODULE) {
    Serial.println("Communication with WiFi module failed!");
    while (true);
  }

  String fv = WiFi.firmwareVersion();

  if (fv < "1.0.0") {
    Serial.println("Please upgrade the firmware");
  }

  if (WiFi.begin(WIFI_SSID, WIFI_PASSWORD) == WL_CONNECT_FAILED) {
    Serial.println("WiFi connection failed!");
    return false;
  }

  int wifitimeout = 15;
  int wifistatus;

  while ((wifistatus = WiFi.status()) != WL_CONNECTED && wifitimeout > 0) {
    delay(1000);
    Serial.print(".");
    wifitimeout--;
  }

  if (wifitimeout == 0) {
    Serial.println("WiFi connection timeout with error " + String(wifistatus));
    return false;
  }

  Serial.println("WiFi connected!!");

  return true;
}

void setup() {
  // Connect to WiFi
  int retry = 6;
  while (!connectWifi()) {
    delay(5000);
    retry--;

    if (retry < 0) {
      Serial.println("Cannot connect to WiFi, press reset to restart");
      while (1);
    }
  }
}#.Setting the screen
To configure the screen, we are going to create a function called draw and we are going to do an initial configuration of the screen inside our function setup:
// ...

// Display configuration
#define SRAM_CS      8
#define EPD_CS       10
#define EPD_DC       9
#define EPD_RESET    -1
#define EPD_BUSY     -1
#define NEOPIXELPIN  40

// 2.7 eInk Display Configuration
Adafruit_IL91874 gfx(264, 176 , EPD_DC, EPD_RESET, EPD_CS, SRAM_CS, EPD_BUSY);
Adafruit_NeoPixel neopixel = Adafruit_NeoPixel(1, NEOPIXELPIN, NEO_GRB + NEO_KHZ800);

void draw() {
  setupDisplay();
  gfx.setFont();
  gfx.setTextColor(EPD_BLACK);
  gfx.setTextSize(2);
  gfx.setCursor(8, 4);

  // This will create:
  // CRYPTO PRICE
  // ------------
  gfx.print("PRICE CHANGE (24h)");
  int maxLineWidth = gfx.width() - 8;
  gfx.drawLine(8, 22, maxLineWidth, 22, EPD_BLACK);

  // Finished drawing
  gfx.display();
  Serial.println("display update completed");

  gfx.powerDown();
}

void setup() {
  // Connect to WiFi
  // ...

  // Setup display
  neopixel.setPixelColor(0, neopixel.Color(0, 0, 0));
  neopixel.show();
  gfx.begin();
  Serial.println("ePaper display initialized");
  gfx.clearBuffer();
  gfx.setRotation(2);

  // Draw
  draw();
}
With this code so far we have been able to:
- Connect to the WiFi network
- Set up the screen
- Display a title on the screen with the text “PRICE CHANGE (24h)”
Now we would have to execute the Binance API and display it on the screen.
#.Run the Binance API and display the result on the screen
We have to consider some things when running the Binance API and that is that we must compare the price of one crypto against another crypto, ideally a stable coin, such as USDT (Tether) or USDC.
That is, if we are going to see the value of 1 BTC, we have to analyze it vs. the value of 1 USDT. Therefore, the URL to query Binance would look like this:
https://api.binance.com/api/v1/ticker/24hr?symbol=BTCUSDTAnd a comparison between 1 BTC vs. 1 USDT for the last 24 hours. That said, our code will be made up of two other functions, plus some modifications to the draw() function we wrote earlier:
// Other constants
const char* restApiHost = "api.binance.com";
WiFiSSLClient client;

// Ticker Display Positions
int tickerX = 8;
int tickerY = 30;
int tickerYMargin = 20;

String getTickerApiUrl(String ticker) {
  String apiUrl = "https://api.binance.com/api/v1/ticker/24hr?symbol=" + ticker;

  return apiUrl;
}

void getUrlResponseForTicker(String ticker) {
  String result;

  client.stop();

  Serial.println("Getting data for ticker:" + ticker);

  if (client.connect(restApiHost, 443)) {
    client.println("GET " + getTickerApiUrl(ticker) + " HTTP/1.1");
    client.println("Host: api.binance.com");
    client.println("Accept: application/json");
    client.println("User-Agent: Mozilla/4.0 (compatible; esp8266 Lua;)");
    client.println("Connection: close");
    client.println();

    while (client.connected()) {
      if (client.available()) {
        char c = client.read();
        // Serial.write(c);
        result += c;
      }
    }

    client.stop();
    Serial.println("Disconnected");

    // Payload
    // --------
    // The payload will be represented by everything contained between
    // the first `{` and the last `}` received from the service.
    int start = result.indexOf('{');
    int end = result.lastIndexOf('}');
    String body = result.substring(start, end + 1);

    // After payload is received, we can transform it to a JSON doc
    DynamicJsonDocument doc(4000);
    deserializeJson(doc, body);
    String symbol = doc["symbol"];
    String priceChange = doc["priceChange"];
    String priceChangePercent = doc["priceChangePercent"];
    float priceChangeNumber = priceChange.toFloat();
    Serial.println(symbol);
    gfx.setCursor(tickerX, tickerY);

    // If the value is negative, we need to set it to be red
    // since the value has decreased on the last 24H
    if (priceChangeNumber < 0) {
      gfx.setTextColor(EPD_RED);
    }

    gfx.print(symbol.substring(0, 3) + ": " + priceChange.toFloat() + " (" + priceChangePercent.toFloat() + "%)");
    gfx.setTextColor(EPD_BLACK);
    gfx.display();
    tickerY += tickerYMargin;
  } else {
    Serial.println(client.status());
    Serial.println("Connection failed");
  }
}

// ...

void draw() {
  // ...

  // Get data
  // --------
  // For getting the data, we need to compare the crypto
  // symbol to a stable coin, for example USDT.
  //
  // Therefore, if we want to compare ETH to USDT, we need
  // to pass ETHUSDT, where the first chars will represent
  // the symbol to be compared, and the rest will represent
  // which symbol to compare it to.
  // Binance API will know how to split this eventually.
  getUrlResponseForTicker("ETHUSDT");

  gfx.powerDown();
}
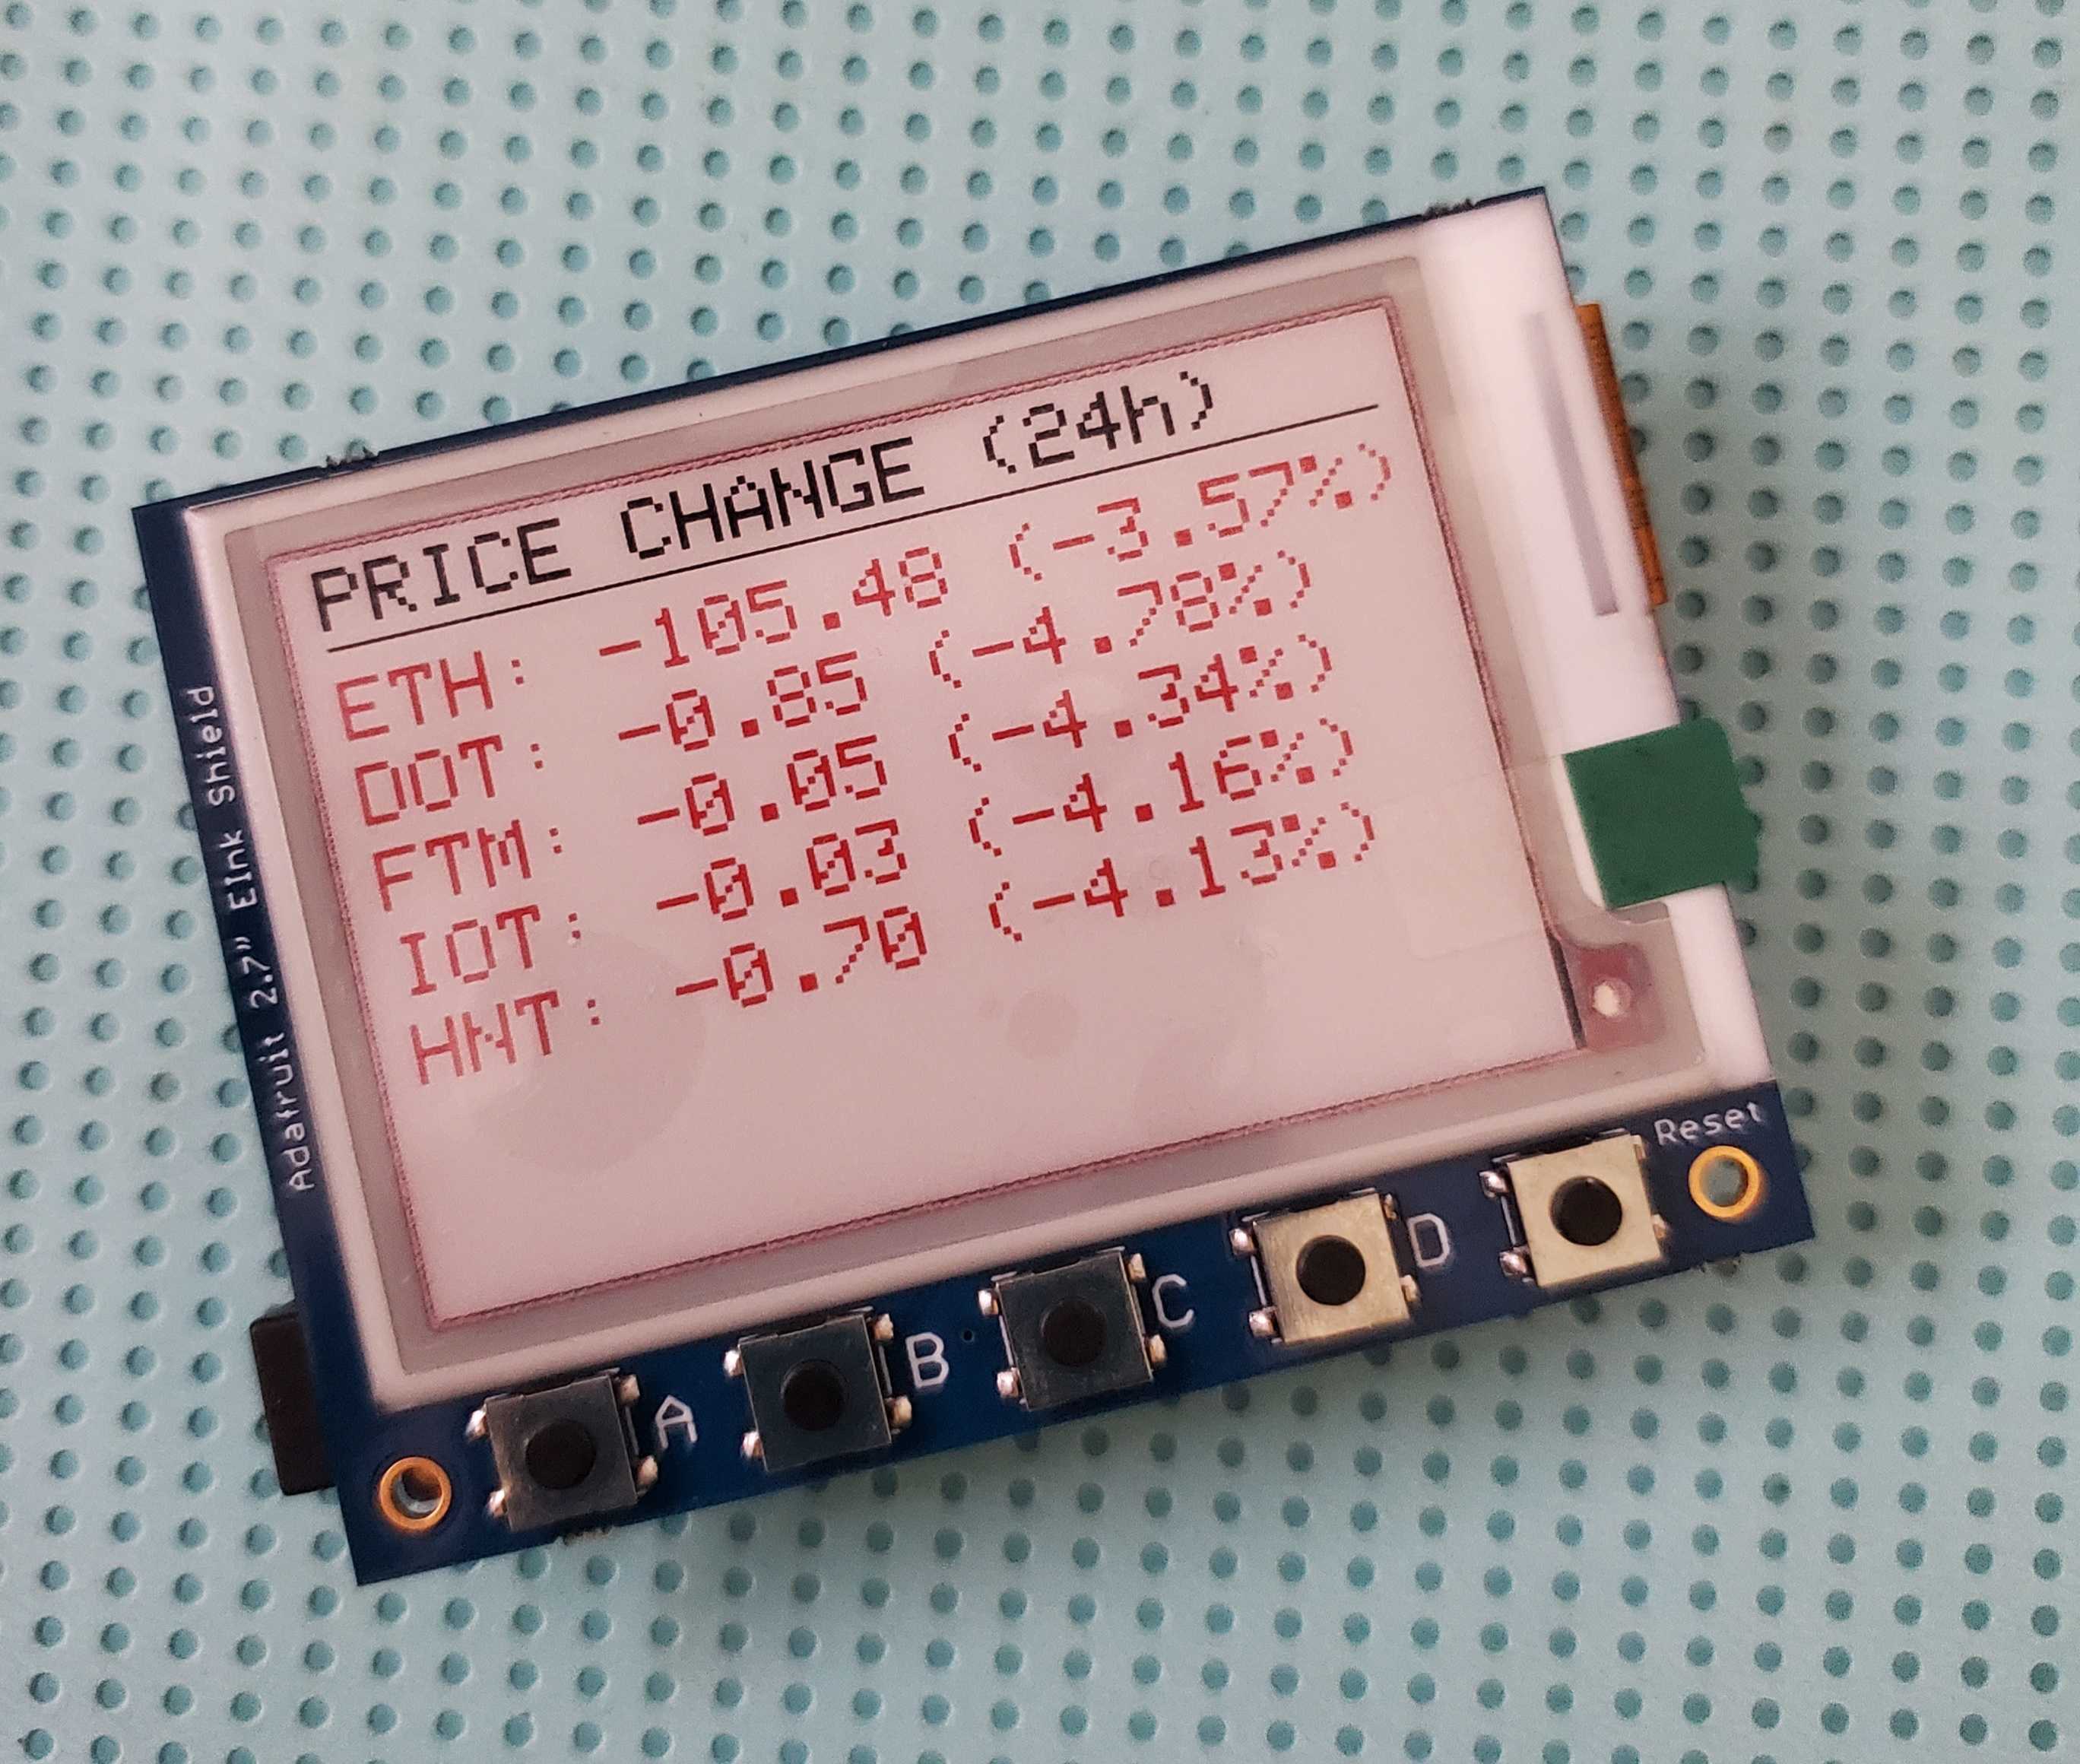
With this we can obtain the price change of 1 ETH vs. 1 USDT during the last 24 hours and it will be displayed on our screen in black (if it is positive) or red (if it is negative).
In the same way we can add more coins. In my case I added the ones that I maintain, which would be ETH (Ethereum), DOT (Polkadot), FTM (Fantom), IOTA (MIOTA) and HNT (Hellium).
The final result is the following:
- Adafruit M4 Metro Airlift (WiFi)↩
- Adafruit 2.7” Tricolor Display↩
- JavaScript Object Notation↩
- WiFiNINA Documentation↩