

Let’s say we are learning a new language. We take a photo of some object and, through the photo, a system tells us what the object is in our native language and the translation of that object in the language we are studying.
For that we would need a few things:
- First, a mobile application. To take the photograph.
- Second, an interaction with a Machine Learning system, for object detection.
- Third, an implementation with a translation service, for the translation of that discovered object into the language we are learning.
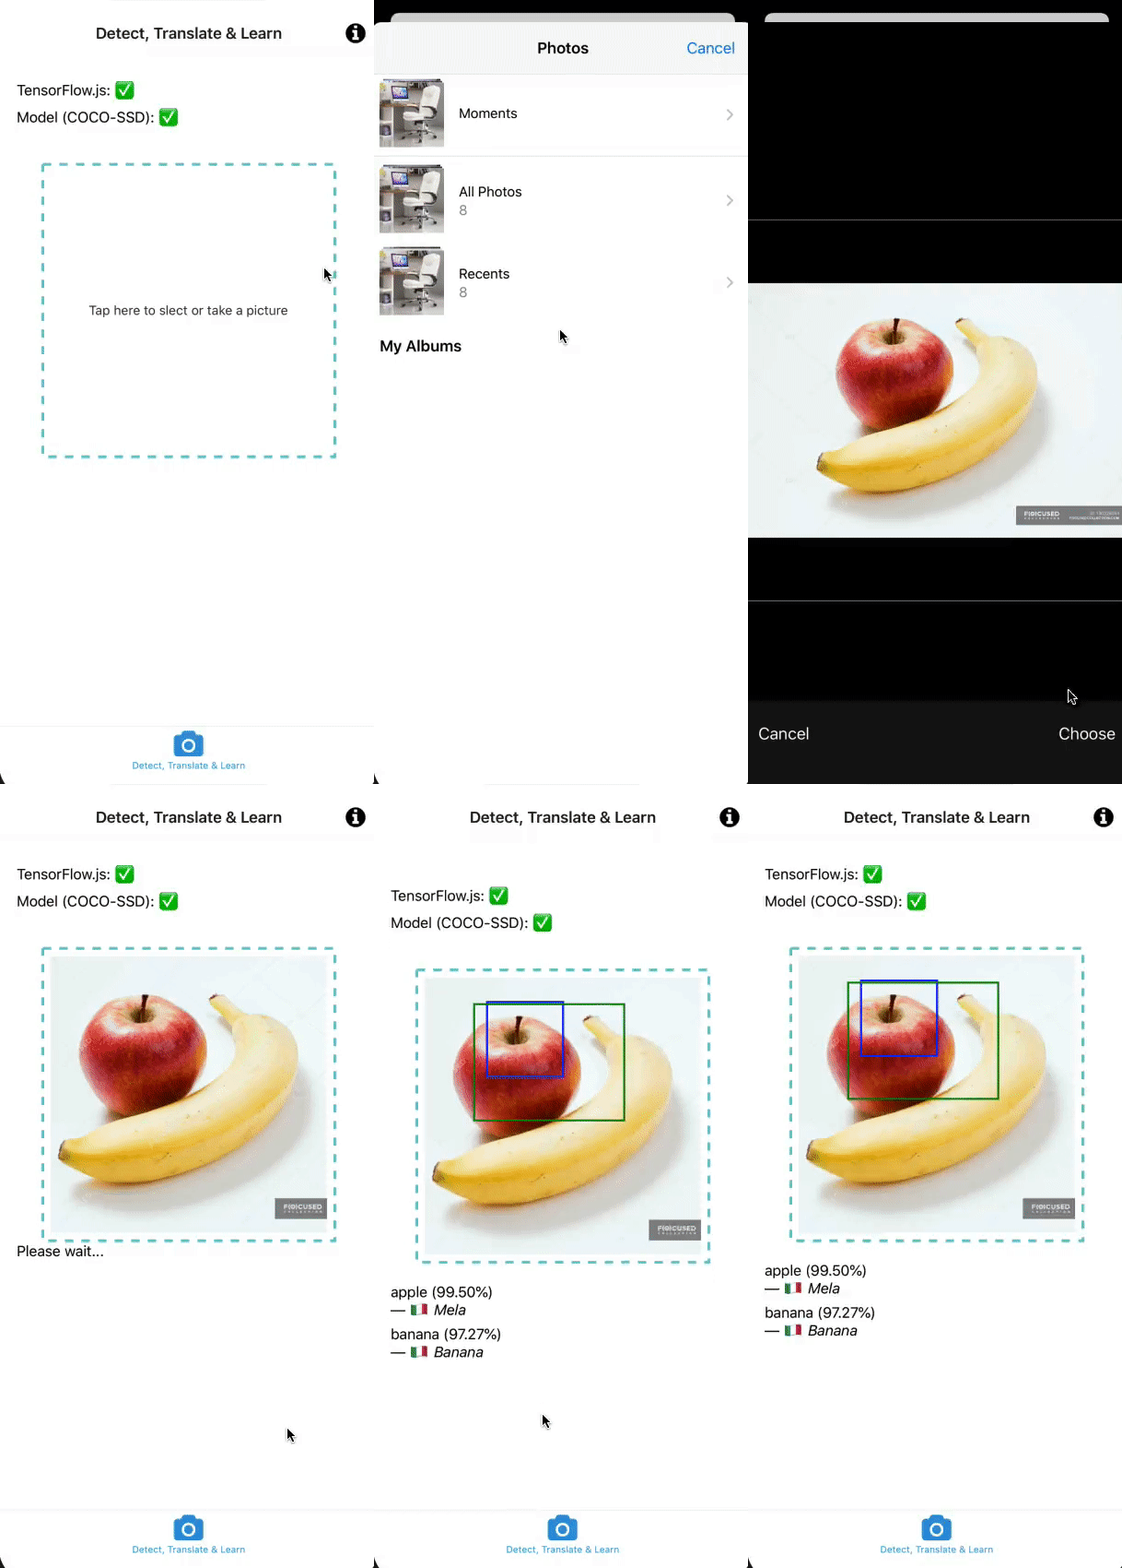
The final result would be something like the following:
#.Setting up the mobile application
For this, we will use Expo.
Expo is an open-source platform for making universal native apps for Android, iOS, and the web with JavaScript and React.
Additionally, we are going to need some packages, I will list them from the configuration of the package.json file:
// ...
"@tensorflow-models/coco-ssd": "^2.1.0",
"@tensorflow/tfjs": "^3.3.0",
"@tensorflow/tfjs-react-native": "^0.6.0",
// ...
"expo-camera": "^12.1.2",
// ...
"translate-google-api": "^1.0.4"#.Configuring the Machine Learning system (TensorFlow)
We are going to use Tensor Flow. TensorFlow is:
TensorFlow is a free and open-source software library for machine learning and artificial intelligence. It can be used across a range of tasks but has a particular focus on training and inference of deep neural networks.
Detecting objects is one of the main functionalities of the implementation of machine learning through computer vision. Thanks to TensorFlow, we can easily use the available API to create and build object detection models.
In our case, we can use available models. One such model is CoCo-ssd or Common Objects in Context, where SSD stands for Single Shot MultiBox Detection.
In the previous step, we already imported the dependency to both TensorFlow and coco-ssd in our project, but we need to connect it to some screen inside our application.
This is why we will make a screen in our project, which is a React component.
// TabOneScreen.tsx

import React, { useEffect, useRef, useState } from "react";

export default function TabOneScree() {
}
And we proceed to integrate it with some of the dependencies that we already imported into our package. Likewise, we require access to the camera and permissions to access it.
// ...
const [isTfReady, setIsTfReady] = useState(false);
const [isModelReady, setIsModelReady] = useState(false);
const model = useRef(null);

useEffect(() => {
  const initializeTensorFlowAsync = async () => {
    await tf.setBackend('cpu');
    await tf.ready();
    setIsTfReady(true);
  };

  const initializeCocoModelAsync = async () => {
    model.current = await cocossd.load();
    setIsModelReady(true);
  };

  const getCameraPermissionsAsync = async () => {
    const {
      status:cameraPermissions,
    } = await ImagePicker.requestCameraPermissionsAsync();

    const {
      status:mediaPermission,
    } = await ImagePicker.requestMediaLibraryPermissionsAsync();

    if (cameraPermissions !== "granted" || mediaPermission !== "granted") {
      Alert.alert("Sorry, we need camera permissions to make this work!");
    }
  };

  initializeTensorFlowAsync();
  initializeCocoModelAsync();
  getCameraPermissionsAsync();
}, []);
// ...
In our visual component, which we can separate from another React component, we are going to show the initialization status of both TensorFlow and the model:
// ...
<View style={styles.loadingContainer}>
  <View style={styles.loadingTfContainer}>
    <Text style={styles.text}>TensorFlow.js: </Text>
    {isTfReady ? (
      <Text style={styles.text}>✅</Text>
    ) : (
      <ActivityIndicator size="small" color="#ffffff" />
    )}
  </View>

  <View style={styles.loadingModelContainer}>
    <Text style={styles.text}>Model (COCO-SSD): </Text>
    {isModelReady ? (
      <Text style={styles.text}>✅</Text>
    ) : (
      <ActivityIndicator size="small" color="#ffffff" />
    )}
  </View>
</View>
// ...#.Starting the photo taking processTo take the photo, we can use Expo Camera, but we want to make sure that we have access to the camera (see previous step) and also that both the model and TensorFlow are ready.
Note: If you noticed from the previous step, we ask for both gallery permissions and camera permissions, so we could import an already taken photo or we could take one through the camera.
<TouchableOpacity
  style={styles.imageWrapper}
  onPress={isModelReady ? selectImageAsync : undefined}
>
  {imageToAnalyze && (
    <View style={{ position: "relative" }}>
      {isModelReady &&
        predictions &&
        Array.isArray(predictions) &&
        predictions.length > 0 &&
        predictions.map((p, index) => {
          return (
            <View
              key={index}
              style={{
                zIndex: 1,
                elevation: 1,
                left: p.bbox[0] * scalingFactor,
                top: p.bbox[1] * scalingFactor,
                width: p.bbox[2] * scalingFactor,
                height: p.bbox[3] * scalingFactor,
                borderWidth: 2,
                borderColor: borderColors[index % 5],
                backgroundColor: "transparent",
                position: "absolute",
              }}
            />
          );
        })}

      <View
        style={{
          zIndex: 0,
          elevation: 0,
        }}
      >
        <Image
          source={imageToAnalyze}
          style={styles.imageContainer}
        />
      </View>
    </View>
  )}

  {!isModelReady && !imageToAnalyze && (
    <Text style={styles.transparentText}>Loading model ...</Text>
  )}

  {isModelReady && !imageToAnalyze && (
    <Text style={styles.transparentText}>Tap here to slect or take a picture</Text>
  )}
</TouchableOpacity>
There are some references that we must have, too, so we create both the states and the methods that are being used:
// ...
const [isTfReady, setIsTfReady] = useState(false);
const [isModelReady, setIsModelReady] = useState(false);
const [predictions, setPredictions] = useState(null);
const [imageToAnalyze, setImageToAnalyze] = useState(null);
const model = useRef(null);
// ...
const imageToTensor = (rawImageData) => {
const { width, height, data } = jpeg.decode(rawImageData, {
useTArray: true,
});
const buffer = new Uint8Array(width * height * 3);
let offset = 0; // offset into original data
for (let i = 0; i < buffer.length; i += 3) {
buffer[i] = data[offset];
buffer[i + 1] = data[offset + 1];
buffer[i + 2] = data[offset + 2];
offset += 4;
}
return tf.tensor3d(buffer, [height, width, 3]);
};
const detectObjectsAsync = async (source) => {
try {
const imgB64 = await FileSystem.readAsStringAsync(source.uri, {
encoding: FileSystem.EncodingType.Base64,
});
const imgBuffer = tf.util.encodeString(imgB64, 'base64').buffer;
const rawImageData = new Uint8Array(imgBuffer)
const imageTensor = imageToTensor(rawImageData);
const newPredictions = await model.current.detect(imageTensor);
// Create tanslations
const translations = await translate(newPredictions.map(prediction => prediction.class), {
tld: "cn",
to: "it",
});
newPredictions.forEach((element, index) => {
element.translation = translations[index];
});
setPredictions(newPredictions);
console.log("Detected objects:");
console.log("-----------------")
console.log(newPredictions);
} catch (error) {
console.log("Error: ", error);
}
};
const selectImageAsync = async () => {
try {
let response = await ImagePicker.launchCameraAsync({
mediaTypes: ImagePicker.MediaTypeOptions.All,
allowsEditing: true,
aspect: [3, 4],
});
if (!response.cancelled) {
// resize image to avoid out of memory crashes
const manipResponse = await ImageManipulator.manipulateAsync(
response.uri,
[{ resize: { width: 900 } }],
{ compress: 1, format: ImageManipulator.SaveFormat.JPEG }
);
const source = { uri: manipResponse.uri };
setImageToAnalyze(source);
setPredictions(null);
await detectObjectsAsync(source);
}
} catch (error) {
console.log(error);
}
};#.Showing results
We are done with the following steps:
- We initialize the mobile project.
- We connect to TensorFlow.
- We use the
coco-ssdmodel. - We have the gallery working (with your permissions).
We have to show the results in the application and to do this we use the additional jsx component and show the results, something similar to the following:
<View style={styles.predictionWrapper}>
  {isModelReady && imageToAnalyze && (
    <Text style={styles.text}>
      {predictions ? "" : "Please wait..."}
    </Text>
  )}
  {isModelReady &&
    predictions &&
    predictions.map((p, index) => {
      return (
        <View key={index}>
          <Text style={[styles.text, styles.translation]}>
            {`${p.class} (${(p.score * 100).toFixed(2)}%)`}
          </Text>
          <Text style={[styles.text, styles.italian]}>
            {`— 🇮🇹 ${p.translation}`}
          </Text>
        </View>
      );
    })}
</View>
If you want, you can see the full code in this GitHub gist.